6 Steps to a Crawl Space Encapsulation
1. Identify the Problem.
 Many homeowners do not know there is mold, water, or other issues in their crawl space until a plumber, pest control, or another service person enters the space for a project or annual service. However, there are several signs you might have a problem without ever entering your crawl space (Check out this article for 10 signs and symptoms you need to have your crawl space inspected: https://www.thedryingco.com/about-us/blog/35176-10-signs-and-symptoms-that-you-need-to-have-your-crawl-space-inspected.html). Have your crawl space inspected by a crawl space expert to determine the causes of any crawl space problems your home may have.
2. Remove Debris & Treat Mold
Once we have identified the problems that need to be addressed, we begin by removing all debris and treating any crawl space mold. Experts remove fallen and damaged insulation, any debris left behind by critters, and torn or damaged vapor barrier. We then treat any mold growth with an antimicrobial solution to prevent mold from continuing to grow.
3. Control Ground Water
Some crawl spaces have a lot of water entering the space. This water increases the humidity in the space, contributing to mold growth and wood rot when temperatures are moderate to warm. Bulk water is addressed using an interior foundation drainage system, similar to a French drain, which diverts the water to the SuperSump Pump System. The Sump Pump moves water away from the home’s foundation and to a spot on the property determined by the homeowner.
4. Prevent Moisture
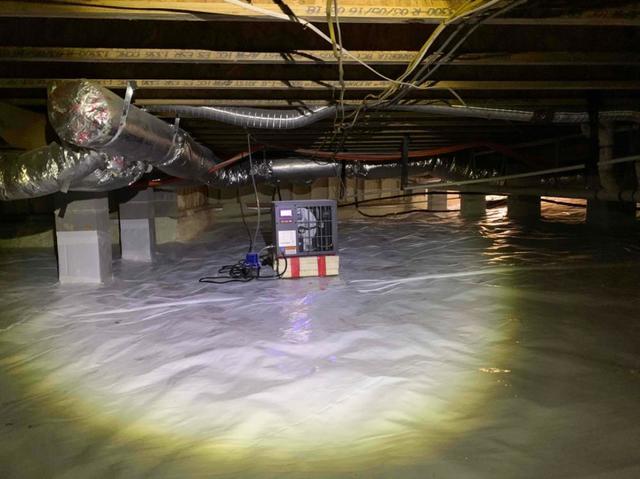
Next, we install a heavy-duty vapor barrier called CleanSpace. This is a 20-mil vapor barrier that is sealed at all seams, run up the foundation walls 6-8 inches above outside grade, and wrapped and sealed around all piers to prevent moisture from the earth from rising into the crawl space.
5. Seal & Insulate
We then seal all crawl space vents from the inside, maintaining the exterior aesthetic of your home. The sill plate, where your home’s frame meets the foundation is sealed, but the full face of the sill plate is left exposed for termite inspections. The rim and band joist, where the joists are supported by rim or band joist which forms the outer box of the floor assembly, is sealed with foam insulation to stop air and moisture infiltration. We then insulate the crawl space walls with a continuous R-10 of insulation using either foam board insulation or closed-cell spray foam insulation. A 2-inch viewing strip is left at the top of the foundation wall, per Virginia Building Code, so that pest control companies can perform their termite inspections. Finally, a friction fit interior crawl space door, developed by our team at The Drying Co., is installed behind the exterior door to both insulate and air seal this often-overlooked space.
6. Keep Air Dry – Dehumidify
Though we have done everything we can to keep outside air and moisture from infiltrating the crawl space, the space is still influenced by temperature, which impacts humidity in the space. We want to keep the relative humidity of the crawl space below 60% to prevent the opportunity for future mold growth. Our dehumidifiers are set to cut on when the crawl space reaches 55% relative humidity. Excess moisture is pulled from the air and removed from the crawl space using a condensate pump. The dehumidifier then filters the air and circulates dry air throughout the crawl space. A hygrometer is provided to the homeowner that monitors the temperature and relative humidity in both the crawl space and inside their home.


